Want to install macOS without messing around with DVDs? Or maybe you need a handy tool to troubleshoot your Mac? A bootable USB drive is the answer!
Table of Contents
This guide’s going to show you how to create one using the macOS Terminal. It’s a bit more techy than other methods, but it’s worth it!
Why a Bootable USB is Awesome:
-
No More Discs: Install macOS on any Mac, anytime.
-
Mac Lifeline: Use the built-in recovery tools to fix your Mac, even if it won’t boot.
-
Clean Slate: Do a fresh install of macOS and wipe everything clean.
How to Create a Bootable USB Using macOS Terminal
Heads Up! This process will completely erase your USB drive. Make sure you back up any important data before you start!
Step 1: Format Your USB Drive
First things first, let’s get that USB drive ready for macOS.
-
Connect Your USB Drive: Plug it into your Mac.
-
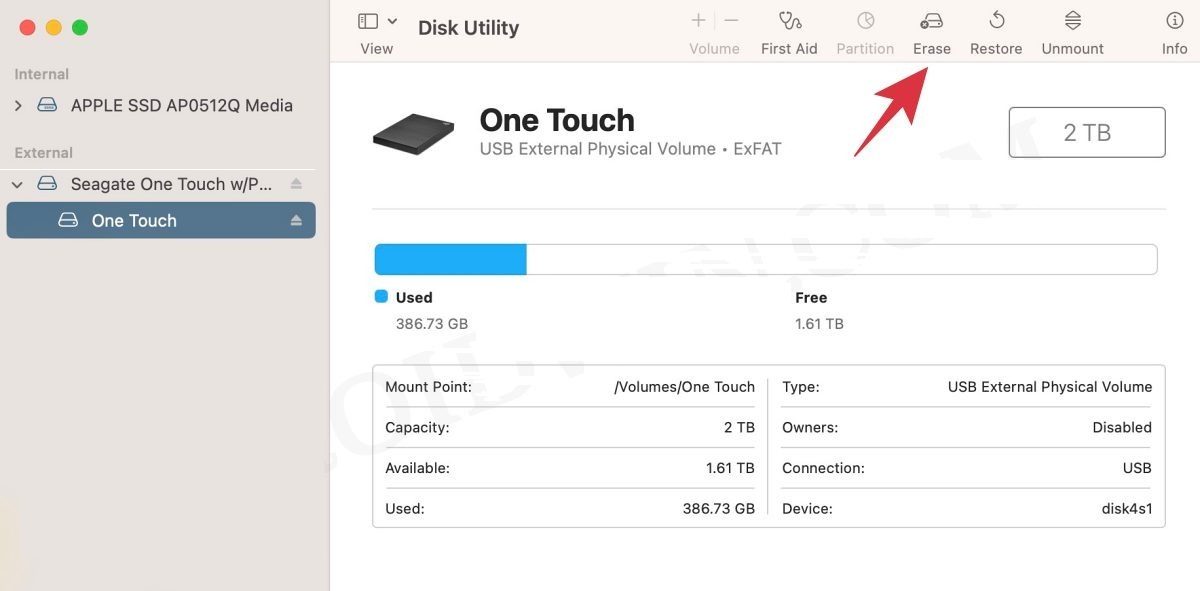
Open Disk Utility: Find it in your Applications > Utilities folder.
-
Select Your USB Drive: Click on it in the sidebar (under the External section).
-
Click “Erase”: Time to wipe it clean!
-
Name Your Drive: Give it a catchy name (we’ll use “MyVolume” in this example).
-
Choose the Right Format: Select Mac OS Extended (Journaled) from the dropdown menu.
-
Erase and Format: Click “Erase” and confirm. Your USB drive is now ready for macOS!
Step 2: Download the macOS Installer
-
Open the App Store: Time to grab the macOS version you want.
-
Search for macOS: Find the version you want to install (e.g., Monterey, Ventura, etc.).
-
Click “Get”: The download will start.
-
Stop the Installation: If the installer tries to start automatically, close it! We’ll use it later.

Step 3: Create the Bootable USB
Now for the fun part—using Terminal!
-
Open Terminal: Go to Applications > Utilities and open Terminal.
-
Enter the Command: Type in this command, but replace “Monterey.app” with the name of the macOS installer you downloaded (e.g., Ventura.app, BigSur.app, etc.) and “MyVolume” with the name you gave your USB drive in Step 1.
sudo /Applications/Install\ macOS\ Monterey.app/Contents/Resources/createinstallmedia --volume /Volumes/MyVolume -
Enter Your Password: You’ll be asked for your Mac’s password. Type it in (you won’t see it as you type, that’s normal).
-
Let it Run: Terminal will do its magic and create the bootable USB drive. This might take a while, so be patient!
That’s it! You’ve got your bootable macOS USB drive. 🎉
How to Use Your Bootable USB
-
Connect the USB Drive: Plug it into the Mac you want to install macOS on.
-
Boot into Recovery Mode:
-
Intel Macs: Hold down the Option key while turning on your Mac.
-
Silicon Macs: Hold down the Power button until you see the startup options.
-
-
Select Your USB Drive: Choose the drive from the list of boot options.
-
Follow the Prompts: The macOS installer will guide you through the rest of the process.
Congrats, you’re now a bootable USB master! You can use this drive to install macOS on any compatible Mac, or even use its recovery tools to fix a broken Mac. Pretty handy, right? 😎
