Are you ready to take your Sony Xperia 1 V to the next level? Rooting unlocks a world of customization possibilities, letting you install mods, tweak performance, and make your phone truly your own.
Table of Contents
This guide will walk you through the process of rooting your Xperia 1 V using a Magisk patched init_boot.img file. We’ll cover everything from downloading the necessary tools to flashing the patched image, so you can confidently unleash the full potential of your device.
Ready to dive in? Let’s get started!
Before we start, make sure you understand the risks:
- Data Loss: Rooting will erase all data from your phone.
- Warranty Void: Your warranty will no longer be valid.
- Widevine L1 Downgrade: You might not be able to watch HD videos on platforms like Netflix.
- SafetyNet Trigger: Banking and other apps might not work.
If you’re okay with those risks, let’s proceed!
1. Install the Android SDK Platform Tools
- Download: Get the official Android SDK Platform Tools from Google’s website. https://developer.android.com/studio/releases/platform-tools
- Extract: Unzip the downloaded file to create a folder called “platform-tools” on your computer.
- Move: Place the “platform-tools” folder somewhere you’ll remember (like your Desktop).
2. Enable USB Debugging and OEM Unlocking
- Go to Settings > About Phone.
- Tap the “Build Number” seven times. This will enable Developer options.
- Go back to Settings > System > Developer Options.
- Turn ON “USB Debugging” and “OEM Unlocking.”
3. Unlock the Bootloader (If necessary)
You might already have your bootloader unlocked. If not, follow the steps in our guide on Unlocking Bootloaders on Sony Xperia. Remember, unlocking the bootloader will wipe your data.
4. Extract Init_boot from Firmware
- Download stock firmware: Use XperiFirm to download the firmware matching your phone’s version.
- Extract firmware: The init_boot.img file will be in the extracted files.
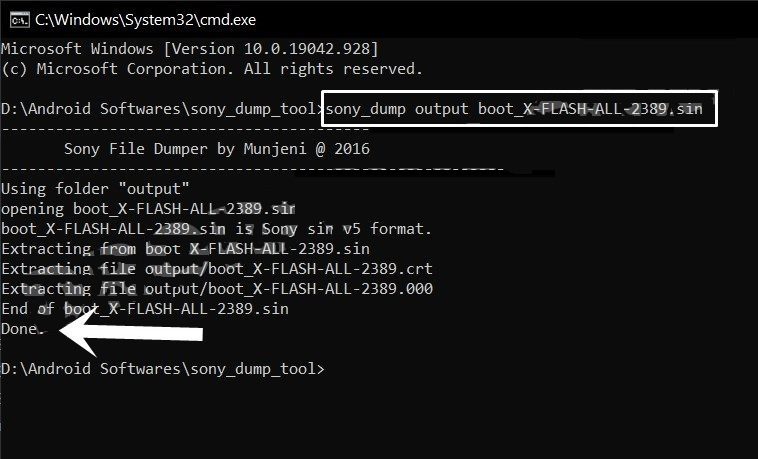
- Convert to IMG: If the init_boot file is in SIN format, convert it to IMG. Follow the instructions in our guide on Extracting Sony Boot.sin and getting the Stock Boot.img File.
- Transfer file: Copy the init_boot.img file to your phone.


5. Patch Init_boot.img with Magisk
- Download Magisk: Get the Magisk app from Magisk Manager.
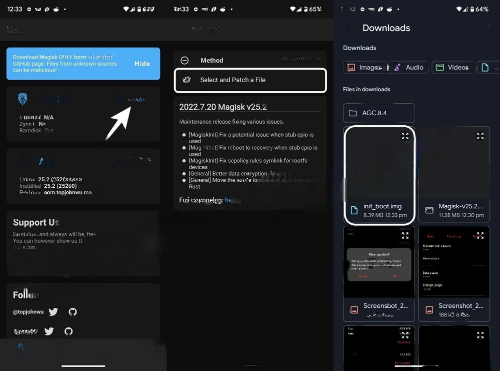
- Open Magisk: Launch the Magisk app and tap “Install” or “Magisk Install.”
- Select file: Choose “Select and Patch a File” and select the init_boot.img file from your phone’s storage.
- Let’s Go: Tap “Let’s Go” in the top right corner.
- Magisk patched file: The patched init_boot.img file will be in your Downloads folder.
- Transfer to PC: Move the patched file to your computer’s “platform-tools” folder and rename it “magisk_patched_init_boot.img.”

6. Boot Your Phone into FastbootD Mode
- Connect your phone: Connect your phone to your computer with a USB cable.
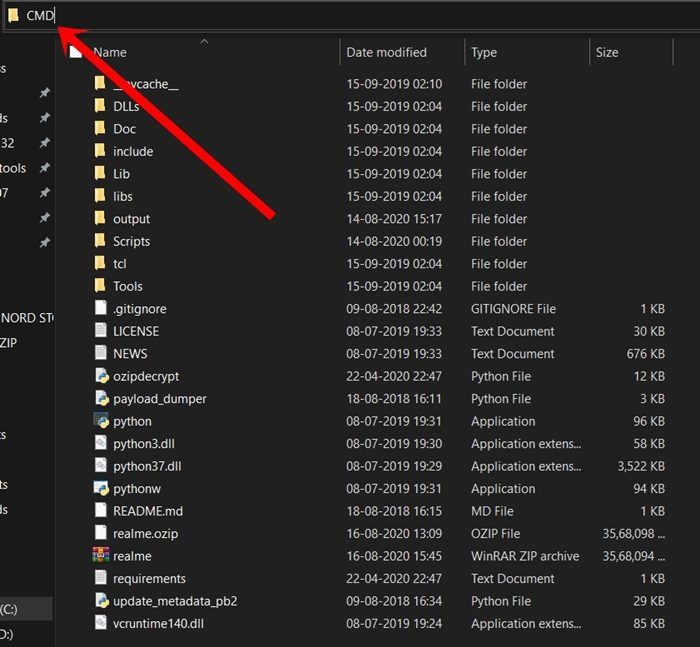
- Open Command Prompt: Go to the “platform-tools” folder and type “CMD” in the address bar and press Enter.
- Enter FastbootD mode:
- Method 1: Type `adb reboot fastboot` in the Command Prompt window.
- Method 2: If Method 1 doesn’t work, try:
- `adb reboot bootloader`
- `fastboot reboot fastboot`


7. Flash the Patched Init_boot.img
- Command: Type this command into the Command Prompt:
* `fastboot flash init_boot magisk_patched_init_boot.img`
Congratulations! You have successfully rooted your Sony Xperia 1 V.
Important Note: These instructions are for the Sony Xperia 1 V. Other devices might have different steps.
If you have any questions or run into problems, let me know. I’m here to help!


![How to Reinstall Chrome on Any Device? [Solution Inside!] How To Delete Google Chrome Browser Thumbnail 5](/wp-content/uploads/2024/07/how-to-delete-google-chrome-browser-thumbnail-5-390x220.png)