Fix: Device Shown As Qualcomm HS USB Diagnostic 900E

In this guide, we’ll show you two methods to resolve the issue where your device is shown as Qualcomm HS USB Diagnostic 900e under Device Manager. The 900e code is usually associated with the Qualcomm HS USB Diagnostic driver, which provides diagnostic capabilities for Qualcomm chipsets and allows users to manage their devices via a command prompt.
Table of Contents
For hard bricks, OnePlus was the only brand with a publicly available unbrick tool. You might need alternative methods to access other tools. Even if you obtain the drivers, they won’t work until you install them on your PC.
If you were to go through the process of unbricking your OnePlus device, you would need to download the drivers from their website and install them on your PC. Once they’re installed, you can connect your phone via a USB cable and run the tool from within Windows.
After you install the drivers for your device, it might still be listed as Qualcomm HS USB Diagnostic 900e under Device Manager. While it’s better than QHS USB Bulk CID, even then your PC won’t be able to identify your device connected in EDL Mode and hence the flashing process will fail. So in order to rectify this issue once and for all, follow along with our guide.
Fix Device shown as Qualcomm HS USB Diagnostic 900e
1: Try out Basic Tweaks
We’ll try some basic USB tweaks, starting with:
- Test the USB drive on a different computer if you are using USB 2.0 ports
- Use a different cable, not the official one that comes with your device.
- Use a computer with an Intel processor rather than one made by AMD.
2: Manually Install Qualcomm HS USB Qdloader 9008 Drivers
Let’s try to resolve this issue by manually installing the EDL Drivers and checking if that works.
- To start, download the manual EDL Drivers file from here.
- Then press the Windows key+X and choose Device Manager from the menu.
- Click on Other Devices, right-click on Qualcomm HS USB Diagnostic 900e and choose Uninstall.
- Then, right-click the QHUSB_BULK and click Update Driver.

- In the next window, click on Browse my computer for driver updates.

- Go to the folder where you extracted Qualcomm USB Drivers and select the entire folder.
- Then click Next.

The following message will appear on your screen: “Installing this driver software will take a few minutes. Do not remove your device from the computer or turn off your computer during the installation.
” When you see this message, click Install this driver update anyway to proceed with the installation. Once done, you will be notified of the same. You may now close the setup dialogue box and check out the results.

3: Disable Driver Signature Verification
If you are running Windows and the Driver Signature Verification is enabled, then Windows will not let you install the EDL Drivers [it might end up showing a yellow exclamation mark next to the drivers]. To avoid this problem, disable the driver signature verification on your PC. Here’s how it could be done:
- To restart your device, press and hold the Shift key while clicking Restart.
- Your computer will now reboot to the Windows Recovery Environment.
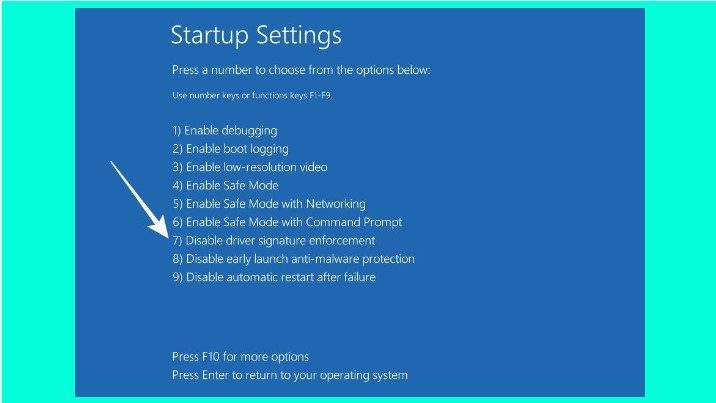
- In the Windows Recovery Environment, click Troubleshoot > Advanced Options > Startup Settings.

- To turn off driver signature enforcement, click Restart at the bottom right of the screen.
- Press 7 or F7 to select Disable Driver Signature Enforcement.

- Your PC will now restart with driver signature enforcement disabled. After the restart, check out the device status.
- If it is listed as QD Loader 9008, then the EDL connection is successfully established, and you may now flash firmware [after flashing is complete, restart your PC to re-enable driver signature enforcement].
- If your computer still lists the device as Qualcomm HS USB Diagnostic 900e, try these advanced USB tweaks and the issue should be resolved.
Common Mistakes to Avoid:
- Skipping Driver Installation: Many users overlook the importance of installing the correct Qualcomm USB drivers, which is a crucial step in resolving this issue.
- Rushing Through Steps: Take your time and follow each troubleshooting step carefully. Rushing through the process can lead to errors.
- Not Backing Up Data: Before attempting any firmware-related procedures, it’s essential to back up your data, as these processes may erase your device’s data.


