Android 13 is pretty sweet, but let’s be honest sometimes you just gotta break free from those manufacturer limitations. Rooting your phone opens up a world of customization, letting you install custom ROMs, tweak performance, and even use powerful Magisk modules like LSposed and Xposed.
But hold up! Rooting Android 13 is a little different from previous versions. We’re here to break down the benefits, risks, and the step-by-step process so you can root like a pro.
Rooting Android 13: What’s in It for You?
Once you’ve rooted your phone, it’s like getting the keys to the kingdom. You can:
- Install Custom ROMs: Say goodbye to bloatware and hello to a whole new Android experience!
- Flash Custom Recoveries: TWRP, anyone?
- Overclock (or Underclock) Your Processor: Fine-tune your phone’s performance for speed or battery life.
- Use Magisk Modules: These powerful add-ons let you do everything from customizing your UI to enhancing audio quality.
- And so much more!
Hold On Android 13 Rooting Has Changed!
Here’s the deal: Rooting Android 13 is a little different from older versions, especially for phones that came with Android 13 out of the box (like the Pixel 7, Xiaomi 13, OnePlus 11, etc.).
-
Before: We used to extract the boot.img file, patch it with Magisk, and flash it.
-
Now: For newer devices, we’re using the init_boot.img file instead.

Don’t sweat it if your phone originally came with an older Android version and was updated to 13 (like the OnePlus 10 or Pixel 6). You’ll still be using the good ol’ boot.img file.
Here’s the breakdown:
-
Phones with Android 13 pre-installed: Use init_boot.img
-
Phones updated to Android 13: Use boot.img
How to Root Android 13: Let’s Get This Party Started
Warning! Rooting can be risky. It could void your warranty, brick your device, or make your cat steal your data. Proceed with caution, and always back up your phone before you start.
1. Install the Android SDK on Your Computer
- Download: Grab the Android SDK Platform Tools it’s a must-have for any Android tinkerer!
- Extract: Unzip those files and put them somewhere you can easily find them (a dedicated folder is a good idea).
2. Enable USB Debugging and OEM Unlocking
- Developer Mode: Go to Settings > About Phone and tap the Build Number seven times. Welcome to Developer Mode!
- Enable Settings: Go back to Settings, find System, then Advanced, and finally Developer Options. Turn on both USB Debugging and OEM Unlocking.
3. Unlock Your Bootloader
- SIM Card Out: Remove your SIM card. Trust us on this one.
- Unlock: Unlocking your bootloader wipes your phone and could void your warranty. Be sure to read our comprehensive Bootloader Unlocking Guide for step-by-step instructions.
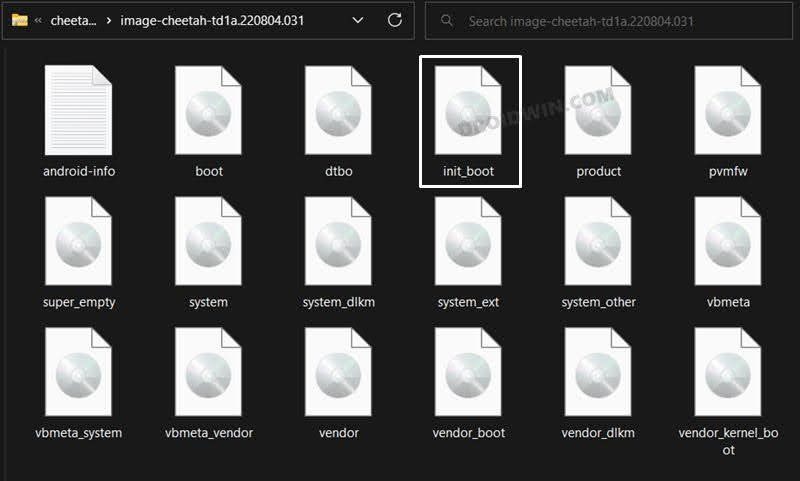
4. Extract Your Stock Boot Image (boot.img or init_boot.img)
- Download Stock Firmware: Get the factory image for your phone that matches your current Android build. You can usually find this on your phone manufacturer’s website or on XDA Developers.
- Check Your Build Number: Go to Settings > About Phone > Build Number to make sure you’ve got the right firmware.
- Extract the Image: Use an extraction tool like 7-Zip or WinRAR to extract the firmware files. The location of the boot.img or init_boot.img file will vary depending on your phone’s manufacturer.
Helpful Resources:
- Realme/Oppo: Extract OZIP Realme/Oppo Stock ROM (Firmware)
- OnePlus: Extract Stock Boot.Img From OnePlus OxygenOS Stock ROM
- Copy the Image: Once you’ve found the right image file (boot.img or init_boot.img), copy it to the “platform-tools” folder on your computer.
5. Patch the Boot Image with Magisk
- Get Magisk: Download the Magisk APK and install it on your phone.
- Patch Away:
- Open the Magisk app and tap “Install” next to Magisk.
- Select “Select and Patch a File.”
- Find your boot.img or init_boot.img file and select it.
- Tap “Let’s Go!” in the top right corner.
- Find the Patched File: Magisk will create a patched file called “magisk_patched.img” in your phone’s Downloads folder.
- Move to PC: Transfer that magisk_patched.img file to your computer’s “platform-tools” folder.
6. Boot into Fastboot Mode
- Connect: Plug your phone into your computer with a USB cable.
- Open Command Prompt: In your “platform-tools” folder, type “CMD” in the address bar and press Enter.
- Fastboot Time: Type the following command and press Enter:
adb reboot bootloader-
Verify Connection: Type this command to make sure your phone is connected:
fastboot devices
7. Time to Root! Choose Your Path:
Path A: For phones updated to Android 13 (boot.img)
-
Temporary Root: We’ll temporarily boot your phone using the patched image to make sure everything works. Type the following command and press Enter:
fastboot boot magisk_patched.img -
-
Open the Magisk app and tap “Install.”
-
Select “Direct Install (Recommended)” in the top right corner.
-
Tap the “Reboot” button in the bottom right corner.
-
Your phone will reboot into a fully rooted state!
Permanent Root: If everything boots up smoothly, it’s time to make that root permanent!
-
Path B: For phones that came with Android 13 (init_boot.img)
-
-
Flash the Patched Image: Type this command and press Enter, replacing “magisk_patched.img” with the actual name of your patched file:
fastboot flash init_boot magisk_patched.img -
Flash Both Slots (If Needed): If the above command doesn’t work, you might need to flash to both slots:
fastboot flash init_boot_a magisk_patched_boot.img fastboot flash init_boot_b magisk_patched_boot.img -
Reboot: Once the flashing is done, reboot your phone by typing this command and pressing Enter:
fastboot rebootYour phone should boot up with root access!
-
Root Access Achieved!
You did it! Your Android 13 device is now rooted, and the world of customization is your oyster. Go explore those Magisk modules, install a custom ROM, and tweak your phone to your heart’s content.
If you run into any issues or have questions about any of the steps, drop a comment below. We’re here to help you on your rooting journey!