How to Change Input on Roku TV

Roku TVs are renowned for their intuitive interface, broad streaming capabilities, and affordability. However, knowing how to switch between input sources is essential, especially if you use external devices like gaming consoles, Blu-ray players, or streaming sticks. This guide will walk you through changing inputs on your Roku TV, managing new inputs, and using features like HDMI-CEC for enhanced control.
Table of Contents
Changing Input on Roku TV with a Remote
Your Roku remote control is your primary tool for navigating and changing inputs on your TV. Follow these steps to switch inputs easily:
- Press the Home Button:
Use your Roku remote to press the Home button and access the main menu. - Navigate to TV Inputs:
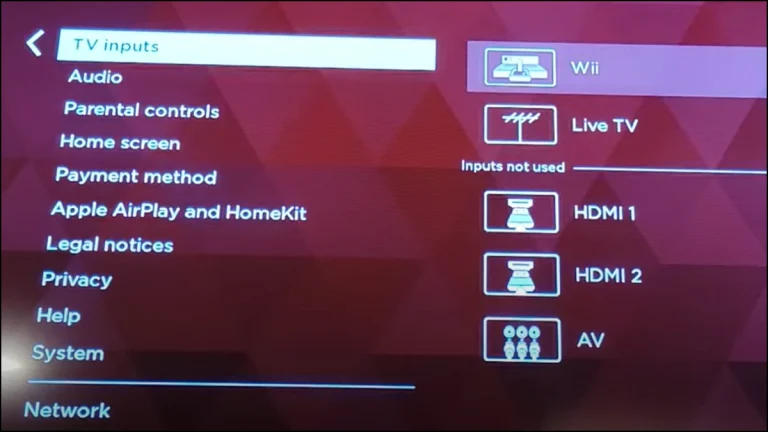
Go to Settings > TV Inputs in the Roku settings menu. - Set Up a New Input:
Select the input port (e.g., HDMI input, cable input) you want to use and click Set up input. - Access the Input from Home Screen:
After setup, the input will appear as a tile on your Roku home screen. Simply select the tile to switch to that source.

Enabling and Using HDMI-CEC for Input Control
HDMI-CEC (Consumer Electronics Control) is a feature that allows your Roku TV to communicate with connected HDMI devices. This enables the TV to switch inputs automatically when a connected device powers on.
- Activate HDMI-CEC:
- Press the Home button on the remote.
- Navigate to Settings > System > Control other devices (CEC).
- Enable HDMI-CEC.
- How It Works:
When a device connected via HDMI (e.g., a gaming console) turns on, the TV will automatically switch to that input. - Input/Source Control:
You can still manually switch back to another input using the Roku remote if needed.
Changing Default Input
Setting a default input ensures your Roku TV opens to your preferred source (like a cable box or streaming stick) every time you power it on

- Open Power Settings:
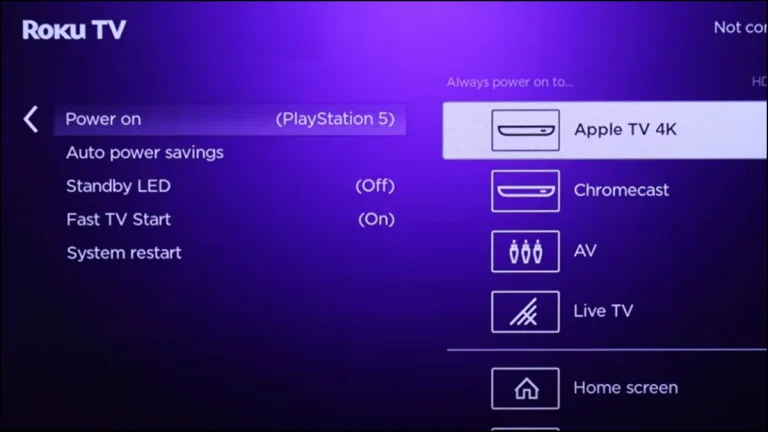
Use the Roku remote to press Home and go to Settings > System > Power. - Select Power On:
In the Power menu, choose Power on. - Choose Default Input:
Select the input you want as the default, such as HDMI input or cable input. - Save Changes:
Your TV will now start on the chosen input every time it powers on.
Changing Input Without a Remote
If your Roku remote control is unavailable or not working, you can still switch inputs using other methods:
Using the Roku App
The Roku app offers an interactive virtual remote and is available on iOS and Android.
- Download and Install the App:
Find the Roku app on the App Store or Play Store. - Connect to Your TV:
Ensure your TV and smartphone are on the same Wi-Fi network, then pair the app with your TV. - Access Input Settings:
Open the app’s Remote interactive feature, navigate to Settings > TV Inputs, and select your desired input.

Using the TV’s Physical Buttons
Most Roku TVs come with physical buttons located on the back or underside of the TV.
- Locate the Buttons:
Find the Power or Volume buttons. - Switch Inputs:
- Press and hold the Power button or use the Volume button to scroll through input options.
- Release the button when your desired input is selected.
Join the Roku Community for Additional Help
The Roku Community is a valuable resource for troubleshooting and discovering tips. Whether you need assistance with a new input, configuring HDMI-CEC, or managing your Roku device, experienced users and official Roku support staff can help.
Visit the Roku Community for answers to FAQs and interactive discussions.
Wrapping Up
Roku TVs make switching inputs simple, whether using a remote, app, or physical buttons. Features like HDMI-CEC and the ability to set default inputs add convenience for users who frequently toggle between external devices. If you have further questions, explore the Roku settings, join the Roku Community, or check out official Roku support for more detailed assistance.
Feel free to share your thoughts or queries in the comments below!